3. Vintage Book Stack with Fresh Flowers
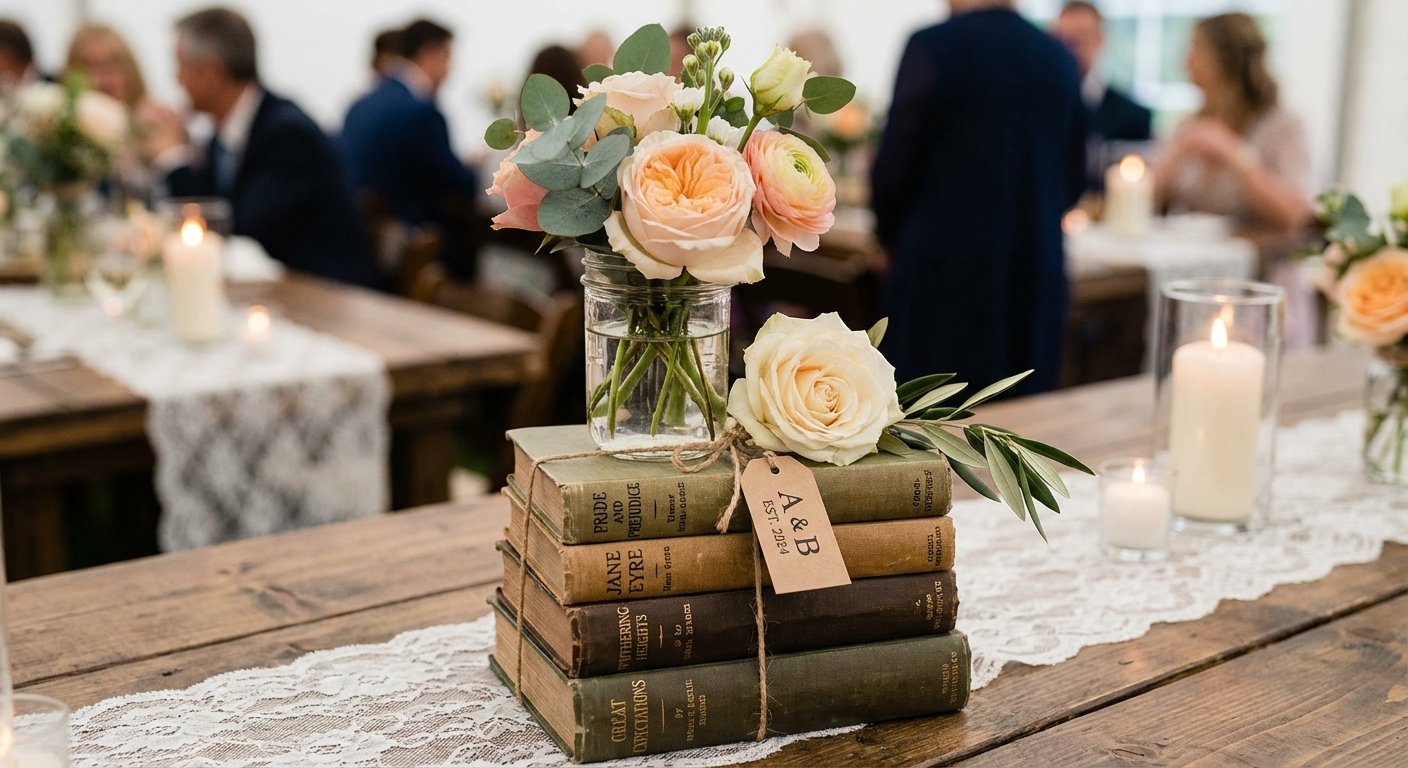
For the literary-loving couple, this DIY wedding centerpiece idea adds a touch of intellectual charm and personalized history to your tables. The concept involves stacking vintage or antique books and topping them with a small floral arrangement, a single statement bloom, or even a simple sprig of greenery. This design infuses your wedding with personality and serves as a fantastic conversation starter for guests.
This idea is highly customizable, fitting themes from classic romance with Jane Austen novels and white roses to a more rustic, academic feel with antique science texts and wildflowers. It's a uniquely personal and budget-friendly choice that tells your story.
Key Details & Tips
-
Aesthetic Target: Literary, Vintage, Rustic, Whimsical
-
Difficulty: Beginner
-
Time Estimate: 15-20 minutes per centerpiece (assembly only)
-
Cost Estimate: $10-$25 per centerpiece (if sourcing books affordably)
Quick Build & Variations
To create your stack, select three to five books of varying sizes and colors that complement your wedding palette. Arrange them in a stable stack, from largest on the bottom to smallest on top. Protect the top book from water damage by placing a small coaster or plastic dish under a mini vase or wet floral foam. Finish with fresh flowers or herbs.
4. Decorative Lanterns with Eucalyptus, Berries, and Candle Accents
Lantern centerpieces offer a charming and versatile option that blends rustic elegance with natural beauty. This DIY wedding centerpiece idea involves pairing decorative lanterns, which can be wooden, metal, or glass, with a central candle or LED light. The design is then softened and customized with organic elements like fresh eucalyptus, seasonal berries, and foliage.
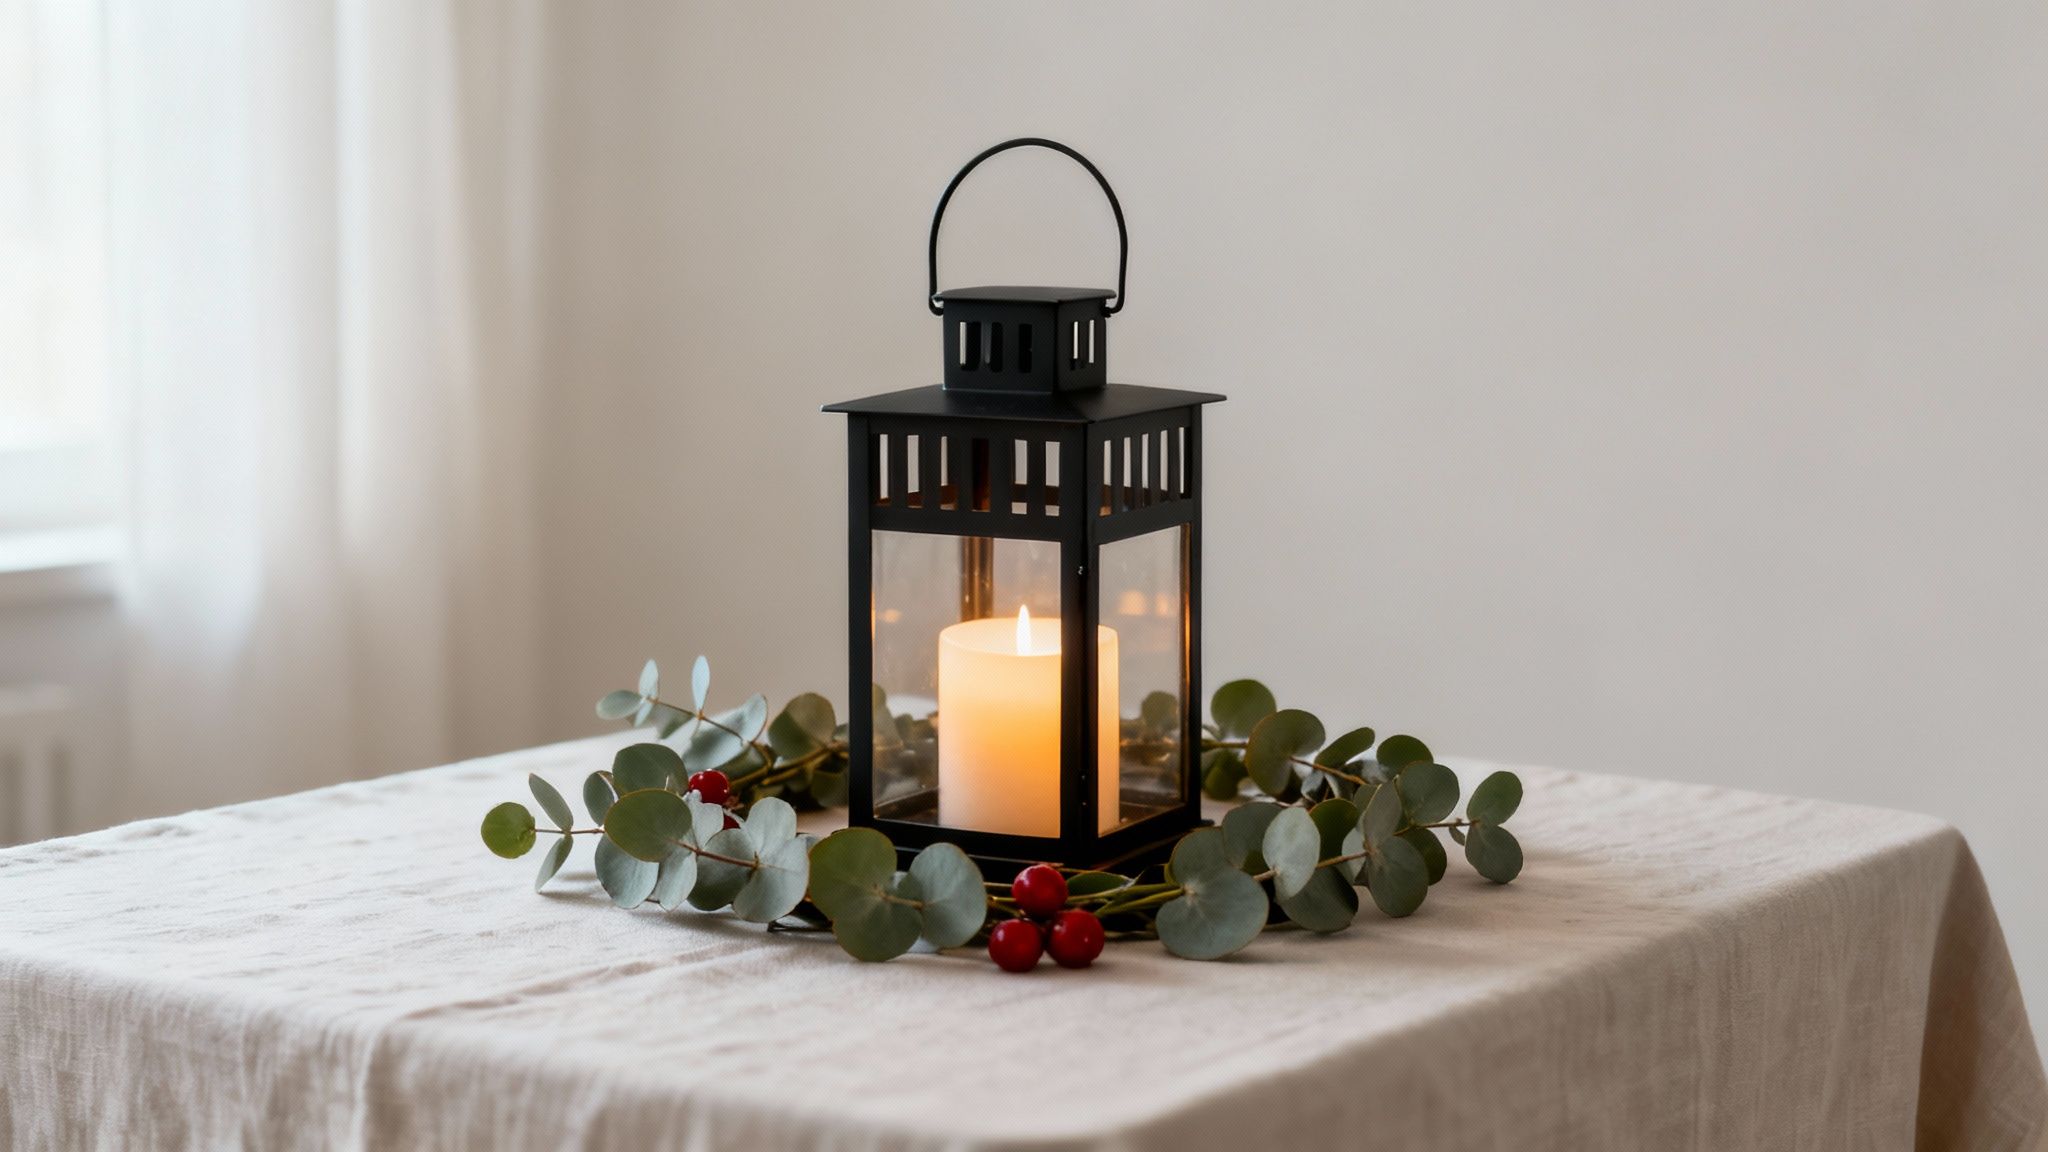
This approach is highly adaptable to any season or theme. For example, use black metal lanterns with red hypericum berries for an autumnal feel, or gold lanterns with cranberries for a festive winter wedding. As a bonus, lanterns can be reused as beautiful home décor after the event.
Key Details & Tips
-
Aesthetic Target: Rustic, Farmhouse, Romantic, Seasonal
-
Difficulty: Beginner to Intermediate
-
Time Estimate: 15-20 minutes per centerpiece
-
Cost Estimate: $25-$45 per centerpiece
Quick Build & Variations
To assemble, place a pillar candle or a cluster of battery-operated fairy lights inside your chosen lantern. Artfully arrange a pre-made eucalyptus garland around the base, weaving in sprigs of seasonal berries like cranberries or blueberries. For outdoor or windy venues, always opt for flameless LED candles to ensure a consistent, safe glow without any maintenance. You can also group lanterns of varying heights to create more visual interest.
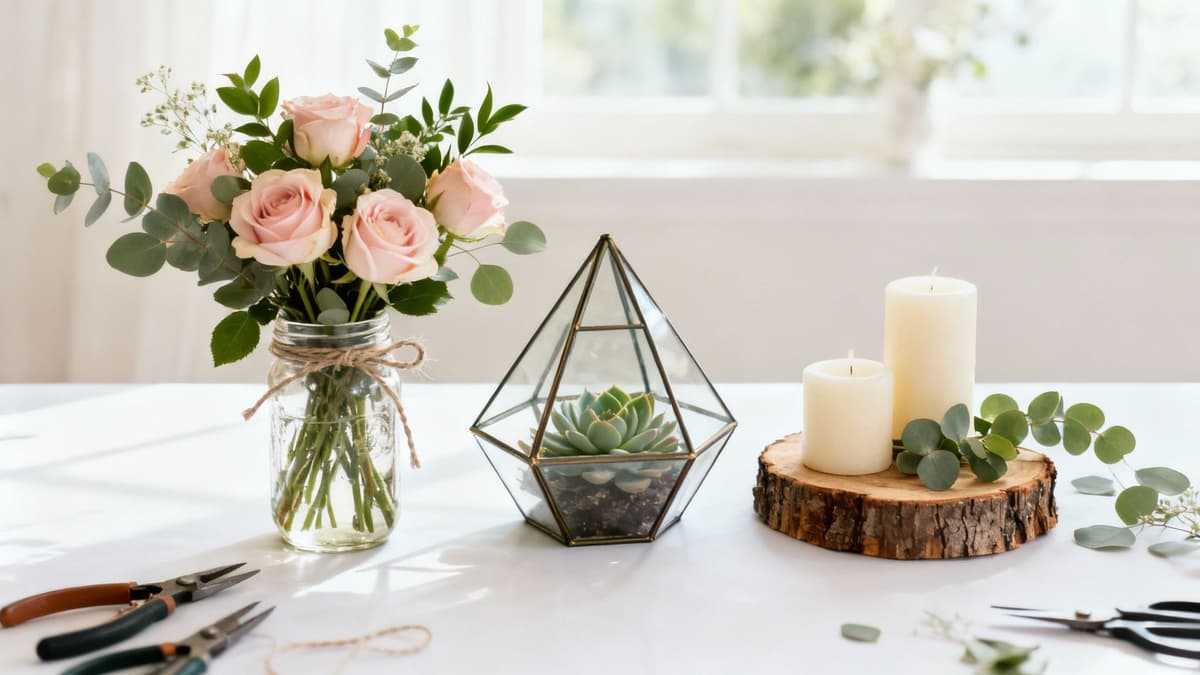
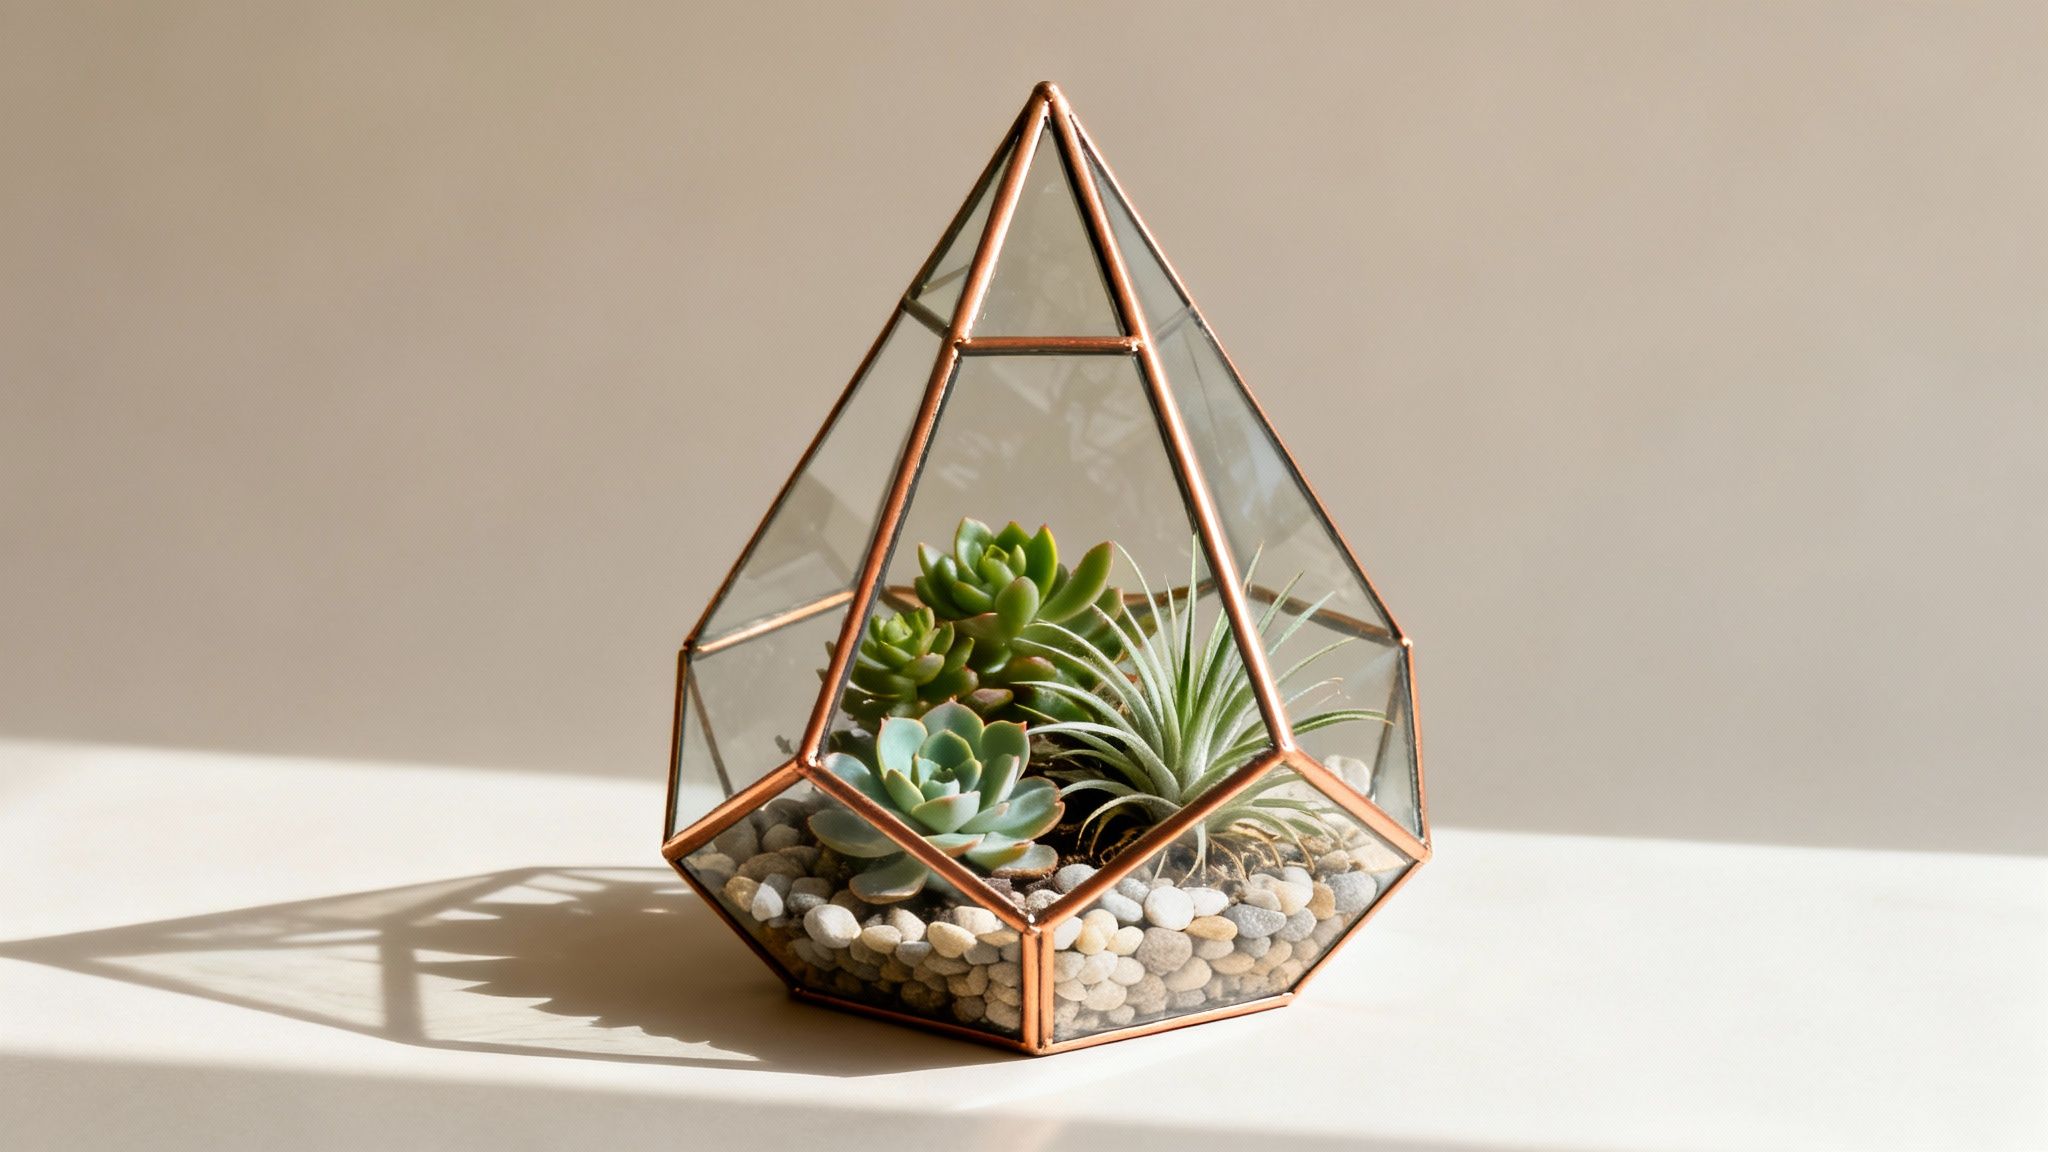
5. DIY Terrarium and Moss Centerpieces
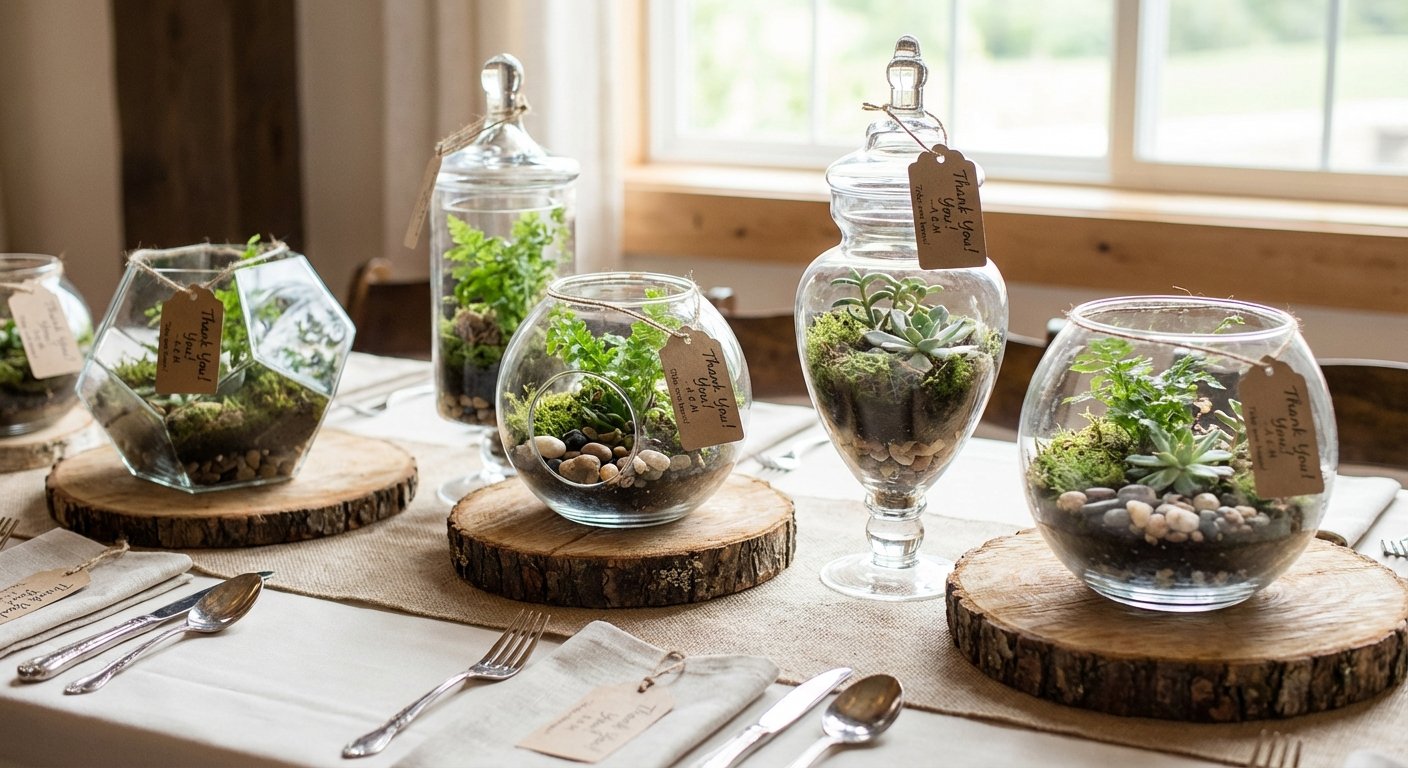
Bring a touch of living, natural art to your tables with DIY terrarium centerpieces. These self-contained miniature landscapes, built within glass vessels, offer an enchanting and sustainable option that doubles as a memorable wedding favor for guests. The beauty of this idea is its longevity; unlike cut flowers, these ecosystems can be prepared weeks in advance and will continue to grow long after your special day.
This concept is perfect for a woodland, bohemian, or eco-conscious wedding theme. You can customize each one to create a unique scene, from a desert-scape with succulents and colored sand to an enchanted forest with lush moss, ferns, and small figurines.
Key Details & Tips
-
Aesthetic Target: Woodland, Bohemian, Rustic, Natural, Eco-Friendly
-
Difficulty: Intermediate
-
Time Estimate: 25-40 minutes per centerpiece
-
Cost Estimate: $25-$50 per centerpiece
Quick Build & Variations
To create your terrarium, layer gravel for drainage, activated charcoal, and potting soil in a clean glass container. Carefully arrange your chosen plants (like small ferns or succulents), then add moss, decorative stones, or small twigs to complete the landscape. For an easier version, use open-air containers which require less maintenance and humidity control. Set up an assembly line with pre-portioned materials in labeled containers to make the process efficient and fun.
6. Milk Bottle and Wildflower Arrangements
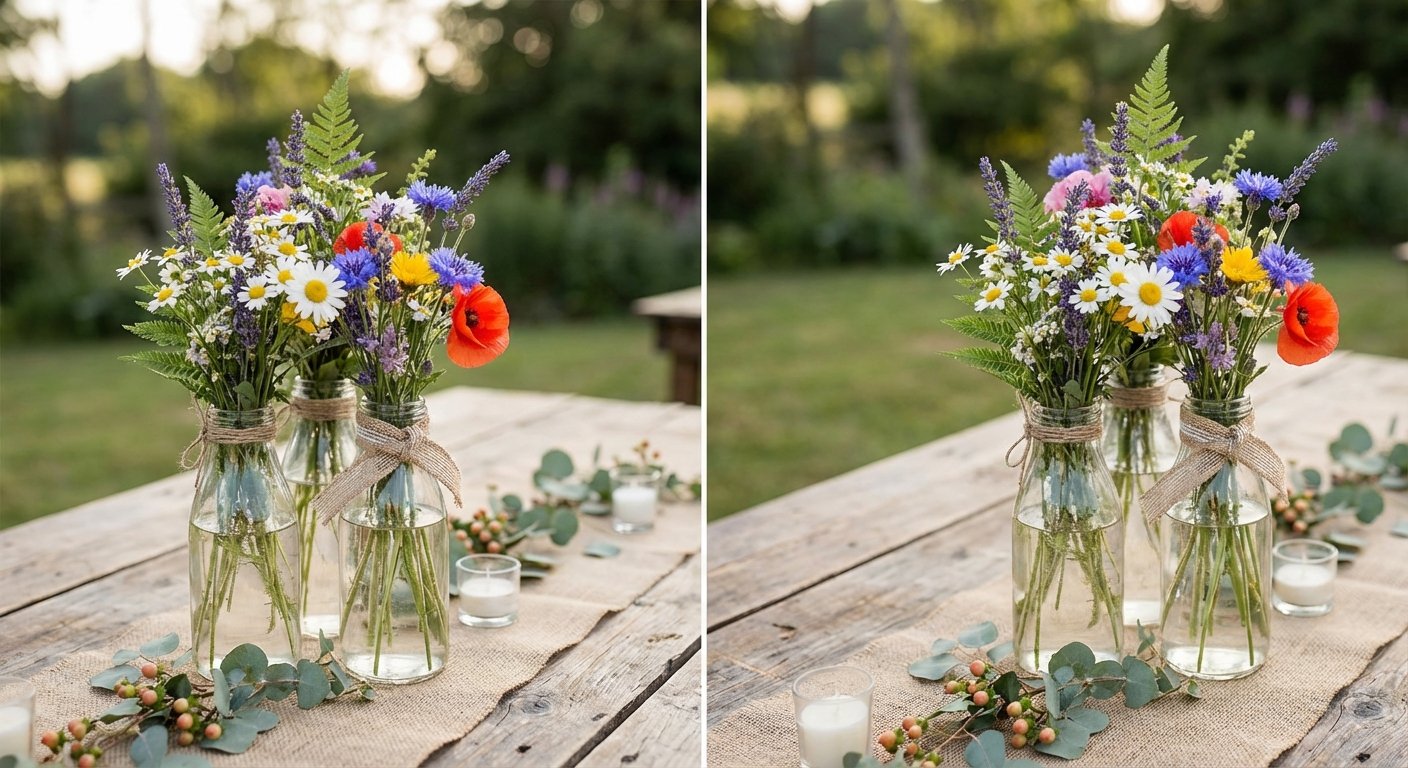
This charming and rustic DIY wedding centerpiece idea celebrates natural beauty by pairing vintage-style milk bottles with an array of wildflowers. Perfect for garden-style, bohemian, or farm-to-table weddings, this concept creates a relaxed, effortless atmosphere. The simplicity of the glass bottles allows the vibrant, untamed beauty of the flowers to stand out.
This design is incredibly adaptable; use a mix of sunflowers and daisies for a cheerful summer event or purple wildflowers and eucalyptus for a more romantic, lavender-themed celebration.
Key Details & Tips
-
Aesthetic Target: Rustic, Bohemian, Garden, Casual, Eco-Friendly
-
Difficulty: Beginner
-
Time Estimate: 5-10 minutes per centerpiece
-
Cost Estimate: $10-$25 per centerpiece
Quick Build & Variations
To create this look, group three to five milk bottles of varying heights at the center of each table. Fill them with a few stems of locally-sourced wildflowers, such as Queen Anne's lace, daisies, and lavender, along with some greenery. For more visual impact, place the bottles on a wood slice or stack them on vintage books to create different levels. Sourcing bottles from thrift stores adds a unique, authentic touch.
7. Potted Herb Garden Centerpieces
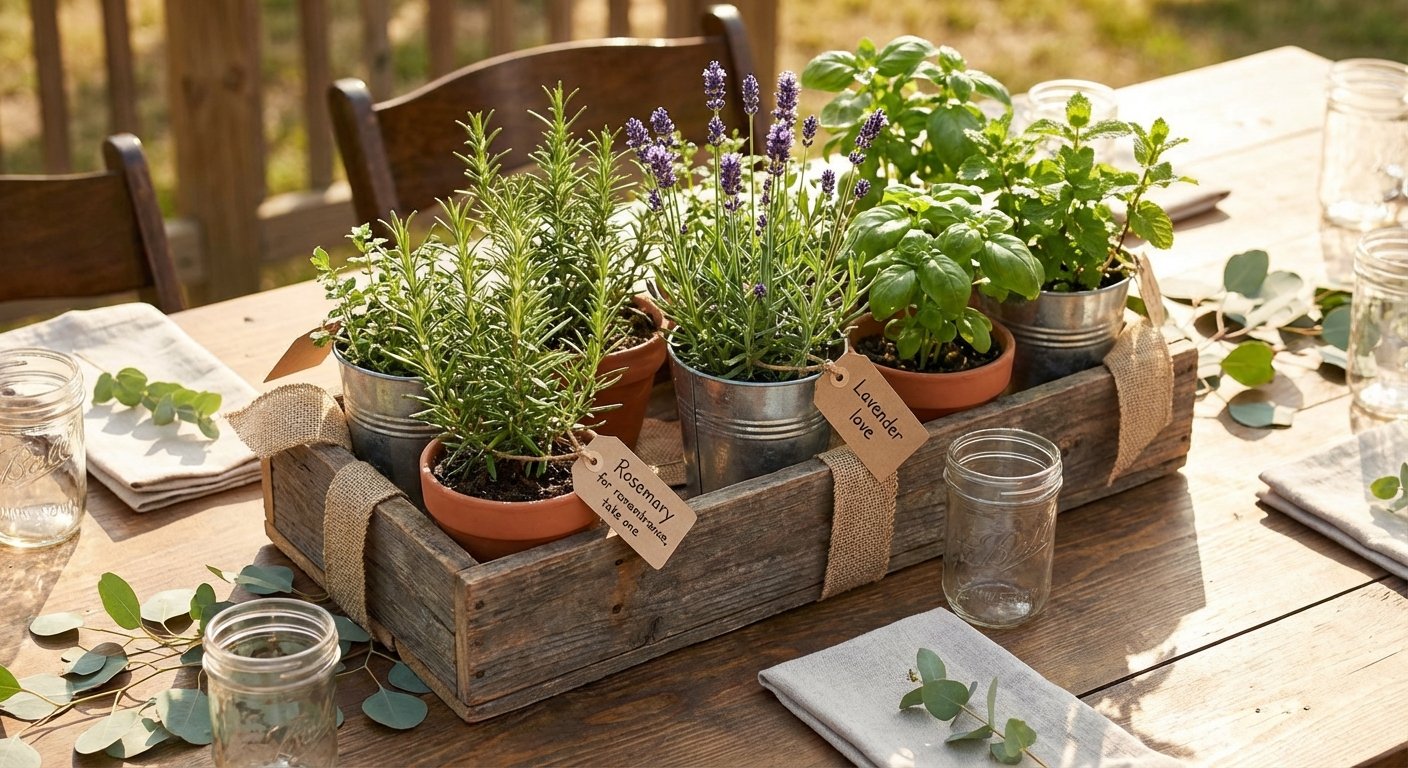
This delightful DIY wedding centerpiece idea offers an aromatic and sustainable touch, perfect for farm-to-table or rustic-themed weddings. Small potted herbs like rosemary, lavender, basil, or mint are arranged in decorative containers, creating a centerpiece that is both beautiful and functional. The fresh scent elevates the atmosphere, and the plants can double as charming wedding favors for guests to take home.
This concept is incredibly versatile. For an Italian theme, group basil, thyme, and oregano in classic terra cotta pots. For a French countryside feel, arrange individual lavender plants in elegant ceramic containers.
Key Details & Tips
-
Aesthetic Target: Rustic, Farm-to-Table, Eco-Friendly, Natural
-
Difficulty: Beginner
-
Time Estimate: 10-20 minutes per centerpiece (for potting/arranging)
-
Cost Estimate: $15-$35 per centerpiece
Quick Build & Variations
Source healthy herb plants from a local nursery two to three weeks before the wedding to ensure they look their best. Group 3-5 different herb varieties per table for visual interest and a richer aroma. Paint the pots to match your wedding colors or leave them natural for a rustic look. Don’t forget to create small care instruction cards to place with each plant so your guests know how to care for their new favor.
8. Photo and Memory Board Centerpieces

This deeply personal and sentimental DIY wedding centerpiece idea turns each table into a chapter of your love story. The concept involves arranging framed photos, polaroids, or printed memories on small decorative easels or boards to create a display that sparks conversation and connection among guests. It’s a beautiful way to share your journey from the first date to your wedding day.
This approach is perfect for intimate, story-driven weddings, allowing you to highlight relationship milestones, favorite travel memories, or a simple timeline of your romance. It's a fantastic icebreaker that invites guests to engage with your personal history.
Key Details & Tips
-
Aesthetic Target: Sentimental, Personal, Rustic, Modern
-
Difficulty: Beginner
-
Time Estimate: 20-30 minutes per centerpiece (after photo prep)
-
Cost Estimate: $10-$25 per centerpiece
Quick Build & Variations
Start by curating a collection of your favorite digital and physical photos. Scan any old pictures for the best printing quality and use a tool like Canva to add captions or dates for context. Print your selected images on high-quality matte photo paper, then arrange them in frames or mount them on small boards. Display them on miniature easels for an artistic touch.
9. Minimalist Stem and Marble Base Arrangement

This DIY wedding centerpiece idea is the epitome of modern sophistication, celebrating the beauty of negative space and clean lines. The concept involves placing a single, striking stem or a very small cluster of blooms in a tall, slender vase set on a solid base made of materials like marble, concrete, or polished metal. The result is a sculptural, architectural piece that feels intentional and high-end.
This design is perfect for contemporary, urban, or minimalist wedding themes where less is truly more. It makes a confident statement without overwhelming the tablescape, allowing other elements like place settings and stationery to shine.
Key Details & Tips
-
Aesthetic Target: Modern, Minimalist, Contemporary, Architectural
-
Difficulty: Beginner
-
Time Estimate: 5-10 minutes per centerpiece
-
Cost Estimate: $20-$45 per centerpiece
Quick Build & Variations
Select a statement flower like a single white orchid, a blush ranunculus, or a few stems of pampas grass. Place your stem in a tall, clear glass or ceramic vase, ensuring it stands upright. Secure the vase onto a pre-purchased marble, concrete, or geometric gold base. For visual interest, vary stem heights slightly across different tables.
10. Mixed Greenery and Wooden Geometric Vessels
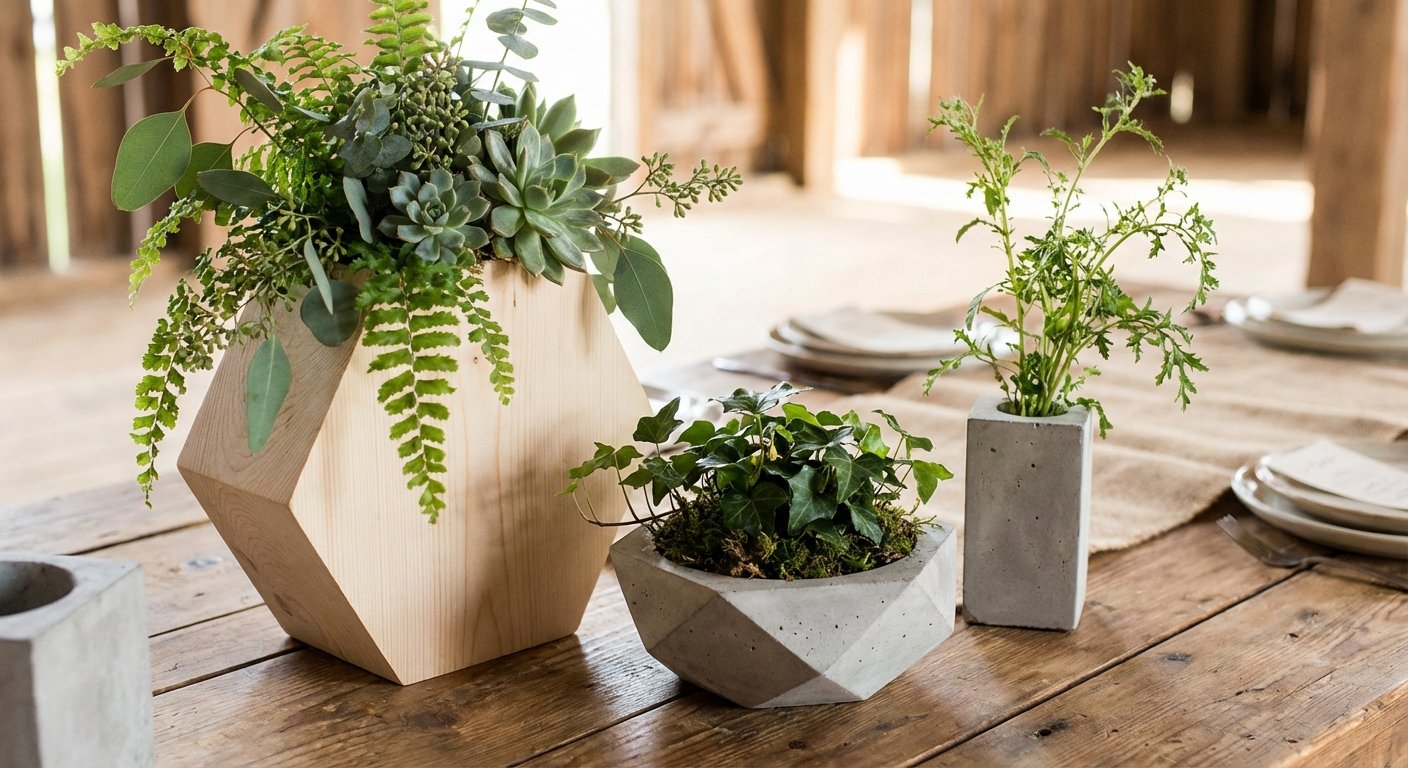
This organic centerpiece idea pairs lush, varied greenery with the clean lines of geometric wooden or concrete vessels. By emphasizing foliage over flowers, this DIY wedding centerpiece idea delivers a major visual impact while often reducing costs, making it perfect for couples aiming for a modern, botanical, or earthy aesthetic. The contrast between wild greens and structured containers creates a look that is both natural and chic.
This style is incredibly versatile. Imagine arrangements of mixed eucalyptus and ferns spilling from a stained wooden cube for a modern vibe, or tropical leaves like monstera in a concrete planter for a coastal theme.
Key Details & Tips
-
Aesthetic Target: Botanical, Modern, Earthy, Rustic
-
Difficulty: Beginner to Intermediate
-
Time Estimate: 20-30 minutes per centerpiece
-
Cost Estimate: $20-$40 per centerpiece
Quick Build & Variations
To build, anchor your greenery stems in floral foam or a flower frog placed inside the vessel. Start with your largest, most structured greens to create the base shape, then fill in with lighter, more delicate foliage for texture and complexity. Use 3-4 different types of greenery, like silver dollar eucalyptus, ferns, and ruscus, to add depth. For a stress-free process, you can visualize and experiment with different combinations using a wedding design studio to perfect your greenery palette.
10 DIY Wedding Centerpiece Ideas Comparison
| Centerpiece | 🔄 Complexity (process) | ⚡ Resources & Cost / Timeline | ⭐ Expected Outcome (quality/impact) | 📊 Ideal Use Cases (results/impact) | 💡 Key Advantages / Quick Tip |
|---|
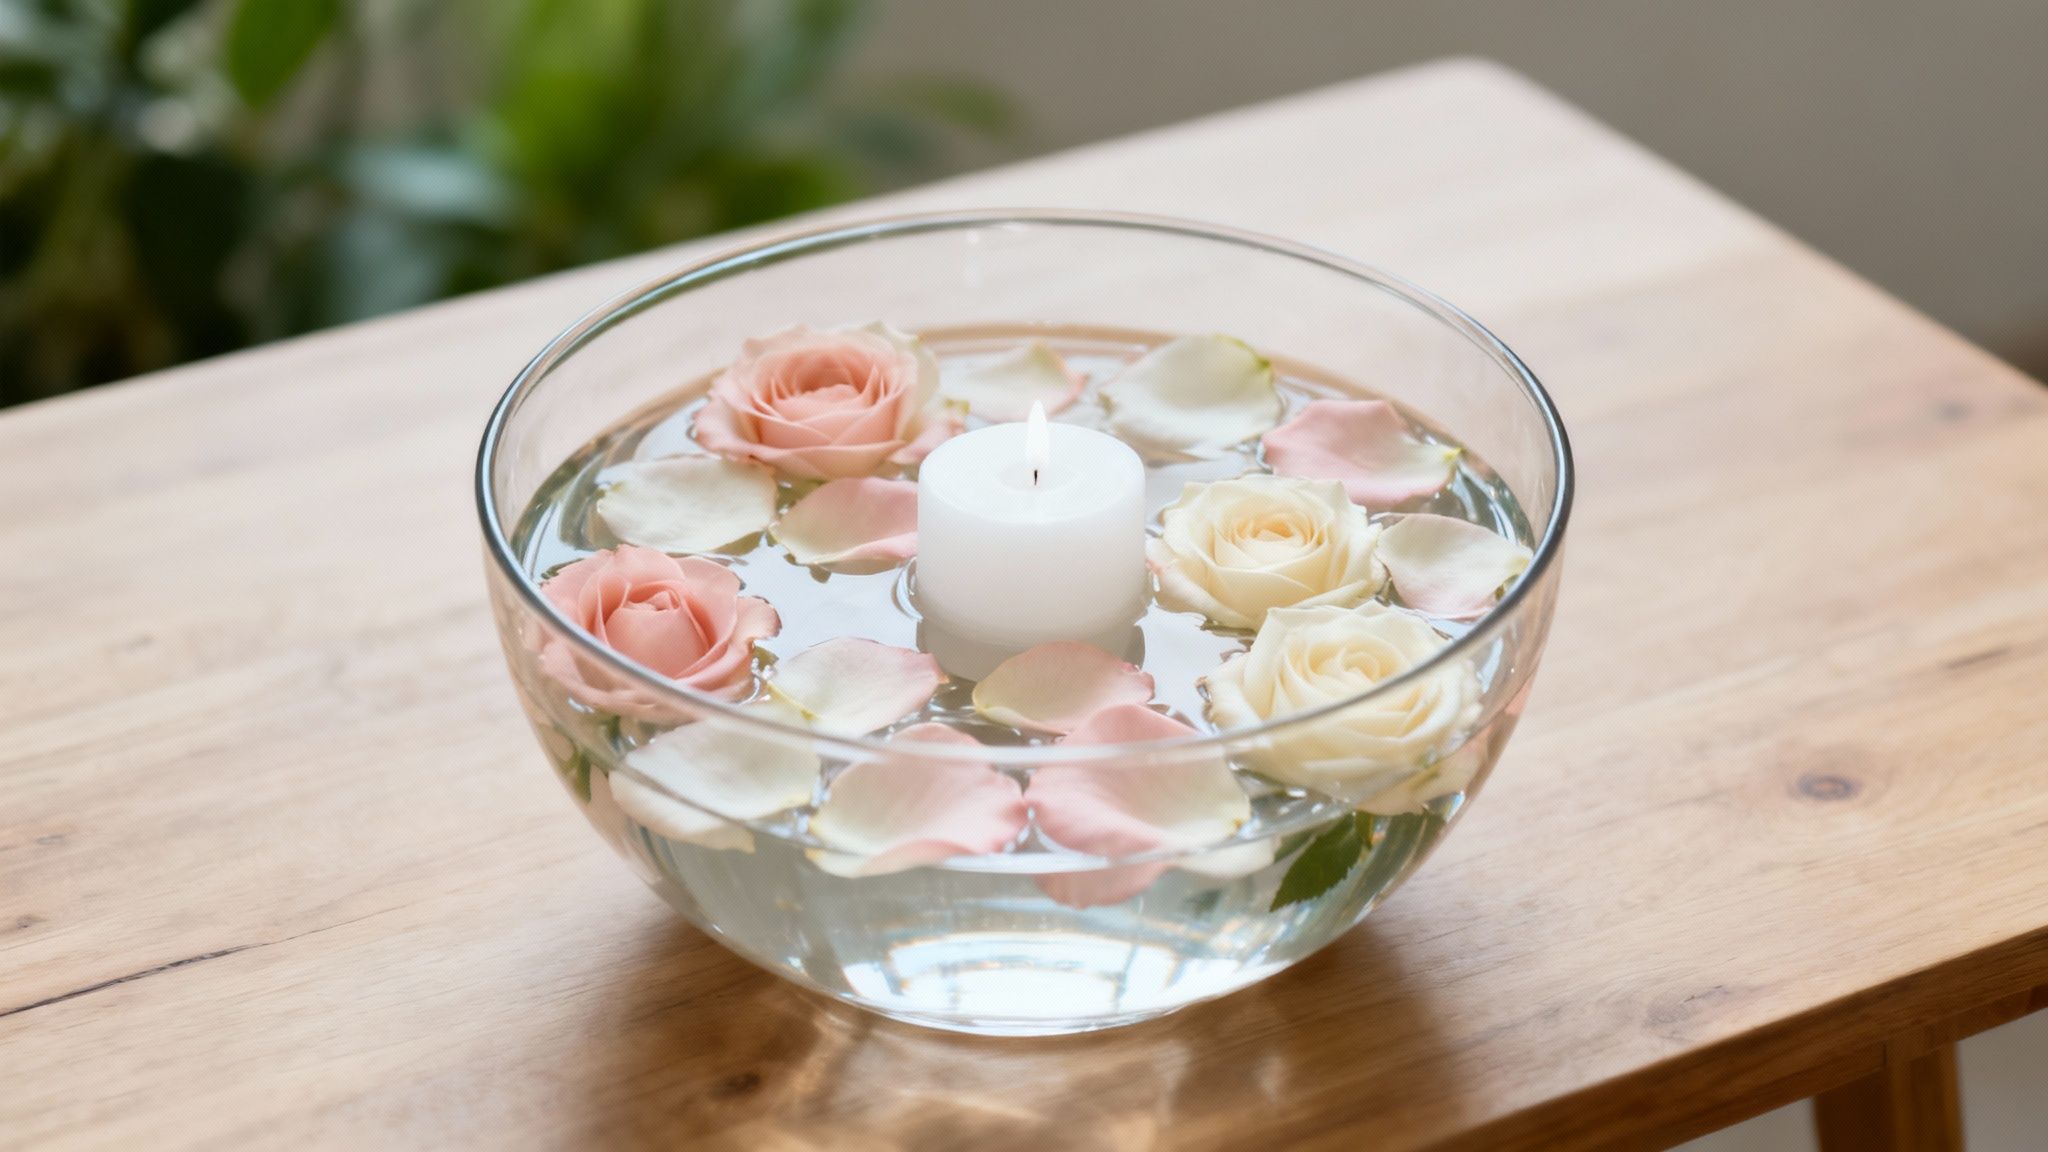
| Floating Candle and Floral Arrangements | Low — simple assembly; careful transport due to water | Containers, candles, flowers; $150–300/10 tables; plan containers 2–3 months ahead; prep morning-of | High ⭐ — romantic, photogenic ambient light | Indoor receptions, romantic/formal tables (avoid windy outdoors) | Use floral food; test candle flotation; consider LED candles for safety |
| Geometric Succulent and Air Plant Displays | Moderate — planting/propagation and terrarium setup | Succulents, geometric containers; $100–200/10 tables; source 4–6 weeks prior; arrange ~1 week before | High ⭐ — modern, long-lasting living centerpieces | Destination weddings, modern/minimal, favors for guests | Include plant care card; propagate extras as backup |
| Vintage Book Stack with Fresh Flowers | Low–Medium — collect/organize books; stabilize stacks | Thrifted/vintage books + small vases; $30–80/10 tables; collect 4–5 months ahead | Medium ⭐ — personal, conversational focal points | Literary, vintage, eclectic or budget-conscious weddings | Use plastic bases to protect books from water; test stack stability |
Bringing Your Vision to Life with a Clear, Calm Plan
You’ve explored a wealth of creative possibilities, from the romantic glow of floating candles to the modern charm of geometric succulent displays. Each of the diy wedding centerpiece ideas in this guide offers a unique way to infuse your personality directly into your wedding decor, transforming your tablescapes from standard rentals into heartfelt reflections of your love story. The key takeaway is that a stunning, handcrafted centerpiece is well within your reach, regardless of your budget, timeline, or crafting experience.
The journey from a Pinterest pin to a finished product, however, requires more than just creativity; it demands clear organization. Your success hinges on breaking down the project into manageable steps and integrating them seamlessly into your overall wedding plan. By thinking ahead about sourcing materials, scheduling assembly days, and coordinating transport, you can avoid last-minute stress and truly enjoy the creative process.
From Inspiration to Actionable Steps
The most important step you can take now is to move from inspiration to implementation. Don't let these exciting ideas remain abstract concepts on a mood board. Instead, turn your chosen centerpiece concept into a concrete project plan with clear, actionable tasks. This is where strategic planning prevents overwhelm and ensures your vision becomes a reality without a hitch.
Remember these core principles as you move forward:
-
Plan Backwards: Start with your wedding date and work backward to set deadlines for sourcing, purchasing, and assembly. A potted herb centerpiece, for example, needs weeks to grow, while a vintage book stack can be assembled the week of the wedding.
-
Budget with Precision: Account for every element, from the primary vessels and florals to secondary items like floral foam, wire, and ribbon. Small costs add up, so tracking them meticulously prevents unexpected budget overages.
-
Schedule a "Mock-Up Day": Before you commit to creating 20 identical centerpieces, build one complete prototype. This trial run is your best tool for finalizing the design, calculating the exact time and materials needed per piece, and identifying any potential challenges.
-
Delegate with Intention: DIY doesn't mean "do it all yourself." Identify specific, easy-to-teach tasks you can delegate to your wedding party or family. Assembling greenery bundles or tying ribbons are perfect jobs for a fun, productive pre-wedding get-together.
By adopting this structured approach, you transform a potentially daunting project into a series of simple, achievable milestones. This method not only guarantees a beautiful result but also protects your peace of mind during the planning process, making your journey to the altar as joyful as the celebration itself.
Ready to turn your favorite diy wedding centerpiece ideas into a flawlessly executed plan? Stop juggling spreadsheets and scattered notes. ItsaYes helps you organize every task, track your budget, and manage your timeline in one calm, intuitive workspace. Start building your clear, confident wedding plan today at ItsaYes.