Your bouquet is one of the few wedding details you physically hold through the day. It's in your hands for portraits, for the ceremony, for the walk back down the aisle, and often for those quiet in-between moments you remember most. Then the wedding ends, and suddenly you're left with a very practical question. How do you preserve something that was designed to be fleeting?
Most couples don't think about bouquet preservation until the flowers are already starting to soften. That's completely understandable. By the time the reception ends, you're tired, emotional, and usually focused on getting home, greeting family, or catching an early flight.
That's why the smartest approach is to treat preservation like any other wedding decision. You make a plan before you need it. The couples who get the best results usually haven't done anything dramatic. They've decided early whether they want pressed art, a resin keepsake, or a DIY project, and they've built one small next step into their timeline.
A bouquet can become framed art, a shelf piece, or a family keepsake. But it only gets that chance once. Flowers don't wait for you to feel organized.
From Bouquet to Heirloom An Introduction
Wedding flowers carry a kind of emotional weight that surprises people. You may spend months choosing the palette, revising inspiration boards, and deciding whether you want garden roses, ranunculus, or something more sculptural. Then the bouquet arrives, and for one day it becomes part of the whole visual language of the wedding.
Afterward, preserving it can feel oddly intimidating. Couples often think they need to make a perfect choice immediately, while still in that post-wedding blur. In practice, bouquet preservation gets much easier when you treat it as the final design decision of the wedding, not a random craft project you tackle later.
That shift matters. Preservation isn't just “drying flowers.” It's deciding what kind of memory you want to live with. Do you want a flat, elegant framed piece that reads like artwork? A dimensional keepsake for a shelf? A hands-on DIY result that feels personal because you made it yourself?
The answer usually becomes clearer if you think about your home, not just the bouquet. If your style leans soft and editorial, the same instincts that shape details like flowers in hair for a wedding often point naturally toward pressed floral art or a minimal display piece.
Preserve the bouquet with the same mindset you used to design the wedding. Choose the version you'll still want to see every day.
There's also a planning reality here. Fresh flowers are like produce from a beautiful market. They're at their best for a short window, and every delay narrows your options. If you decide ahead of time, you can arrange packing materials, choose a preservationist, or set aside a work area for DIY drying before the wedding even happens.
That's what turns the process from stressful into satisfying. Instead of standing in your kitchen the next morning wondering what to do, you already know the next step.
Immediate Post-Wedding Bouquet Care
You wake up the morning after the wedding, the bouquet is on a chair, and the clock matters. Flowers can still preserve beautifully at this stage, but the first priority is simple care that keeps them cool, hydrated, and intact until you begin the method you chose during planning.
Fast action gives you better color, better shape, and fewer mold issues. If you plan to dry the bouquet yourself, prep needs to start soon. Fiore Designs advises preparing the bouquet for drying within 48 hours, removing foliage below the waterline, and avoiding tight ties that can distort the arrangement, as outlined in Fiore Designs' bouquet care guidance.
What to do first
Start with the steps that buy you time and protect the bouquet's structure.
Put the stems in fresh water: If the flowers still look fresh, hydration comes first.
Keep it cool and out of direct sun: A cool bedroom or shaded room is safer than a bright kitchen counter.
Remove damaged material: Take off bruised petals, browning leaves, and any soft or mushy pieces.
Trim for easier handling: Shorter stems are easier to manage if you plan to dry or pack the bouquet.
Support the bouquet gently: Keep the bundle loose enough to hold its shape without compressing the blooms.
What not to do
A few common instincts can cause significant damage.
Don't put it in the freezer: Home freezing ruptures flower cells, which often leaves petals limp or translucent after thawing.
Don't wrap the bouquet in plastic: Plastic holds in moisture and creates the conditions mold needs.
Don't leave it in a hot car: Heat can flatten delicate blooms in a short time.
Don't keep rearranging it: Repeated handling bruises petals and shifts flowers out of place.
Practical rule: If the bouquet feels warm, damp, or soft, give it air, shade, and gentle handling.
A simple 24-hour checklist
If you are tired and want a clear plan, use this order:
Stand the bouquet upright in clean water if you are not drying it right away.
Move it away from sunlight, steam, and heat.
Remove leaves below the waterline.
Confirm your preservation method by the next day so you can prep correctly for air-drying, silica gel, or shipping.
Set out your supplies before you begin so the bouquet is not sitting exposed while you look for boxes, string, or containers.
This stage is about stabilization. Once the bouquet is cool, clean, and handled carefully, you have protected the parts that are hardest to recover later.
Choosing Your Preservation Method
Choose your preservation method before the wedding week, not after. That single decision affects your florist order, your photo list, your cleanup plan, and whether your bouquet becomes a keepsake you love or a rushed compromise made two days later.
The best method depends on four practical questions. What should the finished piece look like. How much of the bouquet's original shape matters to you. How much hands-on work are you willing to do right after the wedding. How much room is in your budget for supplies or professional help.
What each method is really like
Pressed flowers turn a bouquet into framed art. They lose the original 3D form, but they usually win on longevity and display ease. Pressing is a smart choice if you already know you want something on the wall, not a bouquet-shaped object on a shelf. Professional pressed pieces can also work well if you are already planning a coordinated home display, much like couples who enjoy DIY wedding centerpiece ideas that become part of the decor story.
Air-drying keeps the bouquet closer to its original silhouette, but with a softer, more aged finish. It is the lowest-cost DIY option and the easiest to start, yet it asks you to accept fading, brittleness, and some shrinkage. Couples who love that old-world look are usually happy with it. Couples hoping the flowers will still look fresh are usually disappointed.
Silica gel gives DIYers the best chance of keeping shape and more color. It takes prep, space, and patience, but the results are often much closer to what people picture when they say they want to preserve their bouquet. If you want a project that still looks polished at the end, this is usually the strongest home method.
Resin creates a keepsake object rather than a traditional bouquet display. Coasters, trays, blocks, and ring holders are common options. Resin can be beautiful, but it is less forgiving than social media makes it look. Bubbles, yellowing over time, and uneven curing are real risks, especially for first-time DIYers.
Professional preservation services are the right fit when timing is tight, the bouquet includes delicate or expensive flowers, or you know you do not want to experiment. Pressed Floral notes that professional bouquet preservation can range from about $150 to over $700, depending on the method, size, and complexity, and that pressed pieces are often chosen for their long-term display value in frames behind protective glass, as outlined in Pressed Floral's guide to bouquet preservation methods.
Wedding Bouquet Preservation Method Comparison
Method
Average Cost
Timeline
Longevity & Color Retention
Best For
Pressed flowers
$150 to over $700 for professional work, depending on size and design
Depends on provider and custom framing
Strong long-term display potential, with color protected best behind glass
Couples who want framed heirloom art
Air-drying
Low DIY supply cost
Usually several weeks
More fading and brittleness over time
Vintage, relaxed, budget-conscious DIY
Silica gel
Moderate DIY supply cost
Usually a week or two for drying
Better shape and color retention than standard air-drying
Hands-on DIYers who want 3D flowers
Resin
Varies by artist or DIY setup
Depends on drying, casting, and curing
Can hold form well, but appearance may change with age or sun exposure
Small keepsakes and functional objects
Professional preservation
Usually priced by method and final format
Depends on shipping, drying, and finishing
Varies by process and display conditions
Couples who want expert handling
How to choose without overthinking it
Start with the end use. Wall art points to pressing. A bouquet that still reads as a bouquet points to silica gel or professional drying. A decorative object points to resin.
Then be honest about your post-wedding bandwidth.
If you are leaving for a honeymoon, hosting a brunch, or packing up decor the next morning, DIY may sound appealing but still be the wrong fit. If you enjoy careful craft projects and can protect a quiet work area at home, silica gel is often a satisfying choice. If your style is nostalgic and you do not mind fading, air-drying keeps things simple.
Choose pressed flowers if you want a frame-ready piece and care more about longevity than 3D shape.
Choose silica gel if you want to keep more shape and color and are willing to do careful DIY work.
Choose air-drying if you want the simplest low-cost method and like an aged floral look.
Choose resin if you want a smaller keepsake object instead of a full bouquet display.
Choose a professional service if you want expert handling, custom finishing, or less pressure after the wedding.
The calmest plan is to pick your method while you are still making wedding decisions, then let your bouquet design support that choice from the start.
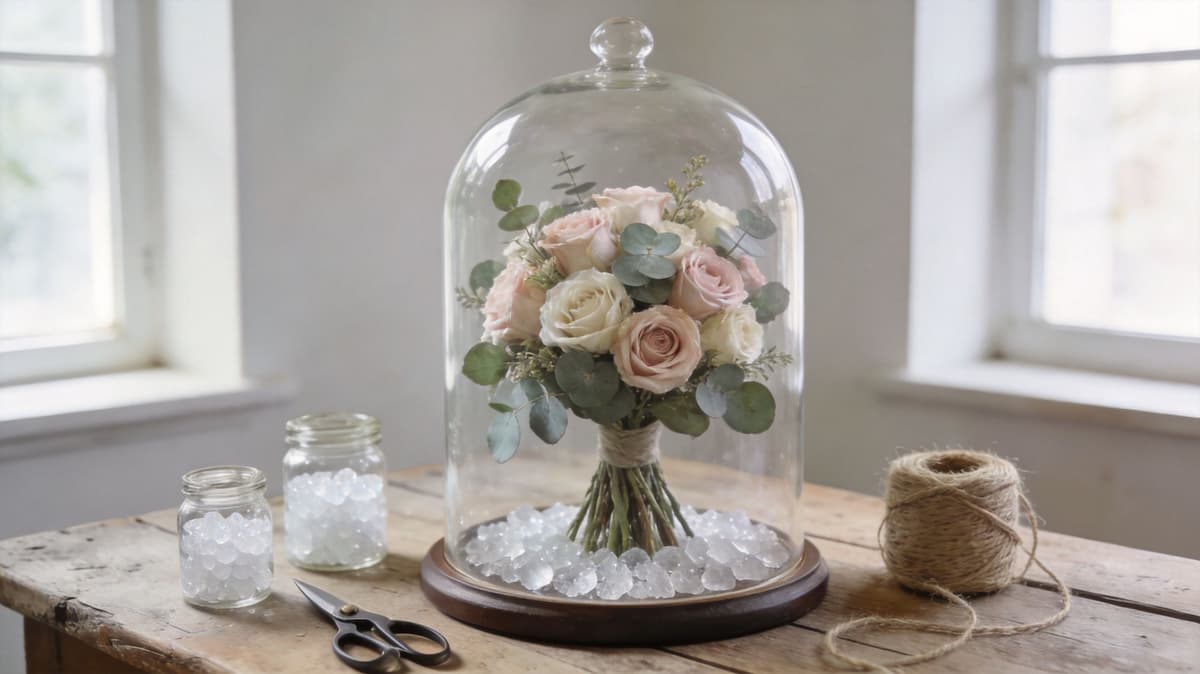
The Ultimate DIY Guide to Silica Gel Preservation
Silica gel is the DIY method I trust most when couples ask how to preserve your wedding bouquet at home without flattening it. It gives flowers a better chance of holding both shape and color, which is why it's often the sweet spot between casual air-drying and full professional service.
Silica gel can preserve up to 90% of a flower's original color, and the core process is straightforward. Trim stems to 1/4-inch, place flowers face-up in an airtight container over a 1 to 2 inch base layer of gel, then fully submerge them and leave them in a dark, stable space for 7 to 14 days. Rushing the process can reduce success from 95% to 70%, according to Well She Tried's silica gel preservation guide.
What you need before you start
Gather everything first. Silica gel preservation goes smoothly when you're not reaching over half-buried flowers looking for scissors.
Airtight plastic container: Clear storage tubs work well because you can monitor without opening constantly.
Silica gel beads or crystals: Buy enough to create a base and fully cover every bloom.
Sharp floral snips: Clean cuts help.
Soft brush: A small makeup brush or artist brush works for cleanup later.
Paper and pen for labels: If you're drying blooms in batches, label each container.
A tray or stable work surface: You want room to move slowly.
If you love making decor by hand, the same patience that goes into DIY wedding centerpiece ideas helps here too. The task is detailed, but it isn't difficult once the setup is right.
Step one, choose the best blooms
Don't preserve every stem just because it was in the bouquet. Select flowers that still look fresh and well-shaped. If a bloom is already browning, tearing, or collapsing at the center, drying won't improve it.
Cut stems down to 1/4-inch. That short stem length makes the bloom easier to support in the gel and helps the flower dry more evenly.
Step two, build the base
Pour a 1 to 2 inch layer of silica gel into the bottom of your airtight container. This base acts like a cushion. It supports the flower head before you start covering it.
Place each bloom face-up on the gel. Give each one space. Crowding is where petals snag, flatten, or fuse together.
Step three, bury the flowers gently
This is the part where people get nervous. Go slowly and let the gel do the work.
Don't dump the silica gel directly onto the center of a flower. Instead, pour around the outside first, then over the petals in a gentle stream so the bloom keeps its shape. You're not packing sand for a beach castle. You're building support from the outside in.
Make sure each flower is fully submerged before sealing the lid.
If a petal folds under while you're burying the flower, pause and correct it immediately. Small shape issues become permanent once drying starts.
For a visual walkthrough, this video gives a helpful sense of pacing and hand position during the process:
Step four, leave it alone
Set the sealed container in a dark, stable environment and resist the urge to check too often. Most flowers need 7 to 14 days. The exact finish point depends on bloom size and moisture content, but patience matters more than hovering.
A rushed result is easy to spot. Petals feel cool or flexible. Centers still seem damp. The flower may look dry on the surface but collapse when handled.
Step five, excavate like an archaeologist
When the flowers are ready, don't lift them out by the petals. Tip the container slightly and remove the gel a little at a time with a spoon or your hand. Then lift from underneath the bloom.
Use a soft brush to remove stray crystals. Slow, light strokes work better than tapping or shaking.
Small adjustments that make a big difference
A few practical habits separate a satisfying result from a box of brittle fragments.
Work in small batches: One rushed large batch is harder than several careful small ones.
Separate delicate blooms: Thin petals need extra space and less handling.
Use the best flowers first: Save the healthiest blooms for your display piece.
Expect some natural change: Preservation keeps beauty. It doesn't create a perfect clone of the wedding-day bouquet.
Silica gel is ideal when you want control, color, and a real sense of making something with your own hands. If that sounds appealing, it's the strongest DIY answer to how to preserve your wedding bouquet without flattening its personality.
Working with a Professional Preservation Service
Working with a professional usually feels easiest when you decide before the wedding, even if the actual shipment happens after. The process is smoother when you already know who's receiving the bouquet, what style they create, and how they want shipments packed.
The timeline is the part couples underestimate. For professional preservation, you must ship your bouquet within 1 to 5 days of the wedding, and the bouquet should be kept cool, wrapped at the stems in damp paper towels, packed in a sturdy cushioned box, and sent by overnight service. From drying through finished design, the process typically takes 8 to 12 weeks, according to The Knot's bouquet preservation guide.
How the process usually unfolds
A well-run experience is fairly calm.
First, you research artists whose style matches yours. Some create pressed frames that feel modern and airy. Others specialize in resin blocks, ornaments, or dimensional work. Look at finished pieces, not just fresh bouquets. You're hiring for preservation design, not wedding floristry.
Then you ask practical questions:
What method do you use
What should the bouquet condition look like on arrival
What sizes and formats do you offer
How should I pack and label the box
What happens if some flowers don't preserve well
Those questions tell you a lot. A thoughtful preservationist will explain trade-offs clearly instead of promising that every flower will stay exactly the same.
Packing for shipment without panicking
Packing matters because flowers bruise from movement as much as from age.
Use a sturdy box. Cushion the bouquet so it doesn't slide. Wrap the stems in damp paper towels, not soaking ones, because dripping moisture creates the wrong environment in transit. Keep the flowers out of plastic if possible, since trapped humidity encourages damage rather than protection.
A good packing rhythm looks like this:
Cool the bouquet first in a shaded indoor spot.
Trim away anything mushy or browning.
Wrap stems with damp paper towels.
Nest the bouquet securely with tissue paper or air cushions.
Add contact details clearly inside and outside the box.
Ship overnight and notify the preservationist once it's sent.
A bouquet travels best when it's packed like a fragile pastry, not like groceries. Support it gently, keep it cool, and prevent shifting.
When professional service is the better choice
Some couples feel a little guilty outsourcing this, as if doing it yourself would be more meaningful. I don't see it that way. If the bouquet is one of your most sentimental wedding details, expert handling is often the most respectful choice.
A professional service is especially useful if:
You're leaving town quickly after the wedding
You want a polished display piece
Your bouquet includes delicate flowers
You know you won't enjoy a detailed DIY process
The emotional payoff comes later, when the finished piece arrives and looks like something made to live in your home, not something you improvised in a tired rush the morning after.
Displaying and Caring For Your Preserved Bouquet
Once the preservation is finished, display becomes the next decision. This part matters more than many couples realize. A preserved bouquet isn't just a souvenir. It's part art piece, part memory object, and part home decor.
If you choose the location well, it becomes something you see naturally. If you choose badly, even beautiful work can age faster or disappear into visual clutter.
The best places to display it
Think like an interior stylist first and a sentimental person second. Your preserved bouquet should suit the room, not feel banished to a spare corner.
Good options include:
A bedroom dresser or wall: Calm light, lower traffic, and a personal setting
A hallway gallery wall: Ideal for pressed floral frames
A living room bookshelf: Best for resin objects or smaller pieces
A deep shelf or console table: Useful for shadow boxes or cloches
If you're styling your home with ceremony details in mind, the same design thinking that shapes how to make a wedding arch often translates beautifully into display choices after the wedding too. Scale, balance, and placement still matter.
What to protect it from
Preserved flowers still need care. They aren't fragile in the same way fresh flowers are, but they're not maintenance-free either.
Keep them out of direct sunlight: Light is hard on color.
Avoid humidity-heavy rooms: Bathrooms and busy kitchens are poor choices.
Dust gently: Use a very soft brush or microfiber cloth around the piece, not aggressive wiping.
The easiest way to protect a preserved bouquet is to treat it like framed art, not like seasonal decor.
Make the piece part of your daily life
The most successful preserved bouquets aren't hidden away “for safekeeping.” They're integrated into the home in a way that feels natural. A pressed frame above a desk. A resin piece on a shelf beside travel books. A shadow box near wedding photos, but not trapped in a shrine-like arrangement.
That balance is what turns flowers into an heirloom. You're not just saving petals. You're giving one wedding-day detail a steady place in ordinary life, where memory tends to feel richest.
ItsaYes helps newly engaged couples turn scattered wedding ideas into a clear, manageable plan from the start. If you want a calmer way to organize your vision, timeline, budget, and next steps, explore ItsaYes.